
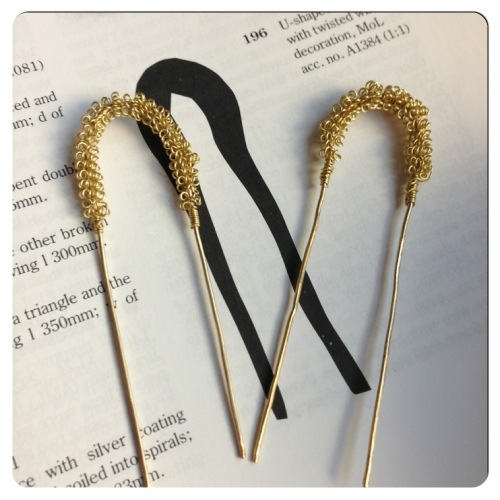
Aina välillä iskee into kokeilla jotain uutta ja jotain ihan muuta kuin tavalliset käsityöhommat. Viime aikoina eniten ovat mielessä ja yöpöydän kirjapinoissa pyörineet erinäiset metallihommat. Tässä ensimmäinen kokeilu: kaksi hiusneulaa, jotka on koristelty metallilangasta kierretyllä spiraalilla.
Alkuperäinen neula on Lontoon kaupunginmuseon kokoelmissa. Se on löydety Finsbury Circuksesta ja on ajoitettu 1300-luvulle. Arvellaan, että sitä on alunperin käytetty joko hiusten tai sitten huntupäähineen kiinnittämiseen. Hiusneula löytyy Egan & Pritchardin Dress Accessories – kirjasta. Jostain syystä kirjassa on ainoastaan neulan silhuetti, mutta tekstin perusteella ja kuvan mittailulla saa aika hyvän käsityksen alkuperäisestä neulasta. Kirjoittajat vertaavat hauskasti koristekiharaa röyhelöhunnun muotoon.

Alkuperäisen materiaaliksi mainitaan englanniksi copper alloy wire, joka olisi oikeaoppisimmin pronssilankaa. Kun löysin kätköistäni messinkilankaa suhteellisen oikeissa paksuuksissa, joten oli pakko kuitenkin kokeilla sillä tätä mystistä neulaa.
Yläkuvassa näkyvät materiaalit – mitään ihmeellisiä metallityökaluja ei täällä kaupunkiresidenssissä ole. Projektissa käytin metallilankaa, lähdekirjallisuutta, leikkuulautaa, sivuleikkureita sekä pihtejä ja samalla ryystin gotlantilaisen Kränku-puodin Ringmursblandning-teetä (joka on lemppariani). Kissa-apu oli luonnollisesti läsnä. Kierretty metallilanka on muuten erityisen kiinnostavaa kissojen mielestä.
Alakuvan ensimmäisessä versiossa näkyy messinkilangan huono puoli – se on aivan tavattoman pehmeää. Sitä piti kovettaa, muttei kuitenkaan liikaa. Koska hiusneulan muoto muistuttaa niin kovasti modernia U:n muotoista ns. hengetöntä hiuspinniä, näin sen koko ajan keskiaikaisena vastineena sellaiselle. Kuten hyvän hengettömän, olisi tämänkin hiusneulan hyvä olla hieman taipuisa.

Sopivan kovuus/taipuisuusasteen saavuttamiseksi oli lankaa työstettävä. Keskiaikaisia menetelmiä metallilangan työstämiseen ovat niin vasara ja alasin kuin vetäminen tätä tarkoitusta varten rei’itetyn levyn lävitse. Kumpaankaan ei ollut välineiden puolesta mahdollisuutta. Onneksi kuitenkin viestin päässä päivystävä metallityön ja arkeologian asiantuntija Kimmo vinkkasi, että lankaa voi pakottaa kovemmaksi myös hinkkamalla sitä metalliesineellä kovaa alustaa vasten.
Kuten kuvista näkee, pakottaminen onnistui mainiosti (ja jätti käsiin samalla aidon metallityön jäljen) ja seuraavista neuloista tuli ensimmäistä neulaa suoremmat ja tukevammat.
Viimeisessä kuvassa on neula tositoimissa (älkää kiinnittäkö huomiota vaaleanpunaiseen tukkaan). Se hädin tuskin erottuu hiuksista ja toimii aivan mahtavan hyvin. Se on lopulta ehkä päivän sensaatiomaisimmalta tuntuva havainto.
Jokainen keskiaikaisia sivulettejä kasaillut tietää sen hankaluuden. Näillä neuloilla se kuitenkin sujui niin vaivatta, että voisi arvailla näiden olleen siihen tarkoitettuja! Tein ohimolta alkavan letin, taitoin sen ja työnsin neulan ylhäältä letin sisään. Pujottelin neulaa letin sisässä kuten hengetöntä nutturaa kootessa. Neula toimi täydellisesti – se jäykisti letin ja samalla kiinnitti sen ohimolle. Vaikka miten kallistin tai heilutin päätä, letti pysyi paikoillaan.
Seuraavaksi olisi hauskaa kokeilla näitä vähän pidempiin hiuksiin, tehdä ainakin yhden pronssilangasta ja kirjoittaa museoon ja pyytää vähän lisätietoja alkuperäisestä.
****
Every now and then I get the urge to try something new and different from the crafts that I usually do. Lately I’ve been thinking and reading a lot about metalwork and metal dress accessories. This is my first try at something completely new: two hairpins with coiled wire decorations.
The original that these pins are based on is a find from Finsbury Circus that has been dated to the 14th century. It has probably been used to fasten hair or a headdress. It is described in Egan and Pritchard’s Dress Accessories (one of the Museum of London books). For some reason the pin is pictured only as a silhouette, but measuring the picture and reading the description does give a quite good idea of the original. The writers make an interesting comparison – comparing the look of the curly wire decoration to the silhouette of a frilled veil!
The original is said to be made from copper alloy wire – so the closest alternative to that would possibly be bronze wire. But I found I had some brass wire in almost the perfect gauge I had to give a go at making a pin like this slightly mysterious one form London.
Known medieval ways to harden the wire are the good old anvil and hammer -combo as well as drawing the wire through a drawing plate specially drilled for this purpose. I lacked both these alternatives. Thankfully my friend Kimmo who is very knowledgeable in both metalwork and archaeology suggested I could harden the wire by just rubbing it with something metallic against a hard surface. That had the same hardening effect and the next pins turned out better (and that gave my hands the look of metalwork).
In the last picture you can see the pin in use (overlook the pink hair). You can hardly see it, but it works absolutely marvellously. This I think was the most sensational moment in all of this.
Everyone who has set (or tried to) their hair in these cornettes- type braids knows it’s not the easiest thing. But with these pins, it was super simple! I braided my hair at the temples, folded the braid and secured it with the pin, using it like I would my modern hairpins, threading it into the hair and fastening it at the temple. It just did exactly what it was supposed to. The braid was stiff and firmly attached. I could shake my head and the braids would not budge.
What I would like to try next is some bronze wire, try these on someone with longer hair and perhaps write to the museum and ask a few questions about the originals.
In the picture above you can see all the materials I had at hand. I don’t have any very proper metalwork tools here at my very urban residence. All I used was the previously mentioned wire, some source literature, cutters, pliers, a cutting board. I kept myself going with my very favourite Ringmursblandning-tea from Kränku in Gotland. Oh and cat assistance too! Coiled wire is VERY interesting to cats.
In my first version of the pin which you can see below the cat assistant you’ll notice the downside of the brass wire. It is really really soft. It needed to be hardened, but not too much. The shape of the hairpin reminded me a lot of the hairpins I use (ie the non bobby pin- kind of u-shaped hairpins) when doing up my hair. I kept thinking about this as a medieval equivalent to those. It should be a little bendy.
Lovely hairpins. Every time I see these I keep thinking that I should get round to making some. Also, that I should get round to making the medieval hair blog post I keep thinking of (although the lack of camera at the moment now gives me a real reason to not do it).
I’m not surprised that the hairpins work wonderfully. Very similarly shaped ones (minus the fancy detail at the top, or with rather different fancy detail) are in vogue in the long haired communities online – they are usually referred to as ’Amish pins’ as the Amish still wear them, still hand-make them and are one of the best places to buy them.
Oh, P.S., if you want someone with super-long hair to try this style, I’m more than willing. I think I’m almost getting to longer-than-is-authentic now…
Try! Perhaps it will work with the Amish pins too! One detail was that trying this my hair was perfect – a few days ”old” since the last wash, with remnants of hairspray and dry shampoo in it, which made it perfect for plaiting.
Yes, ”dirty” hair is always better for plaited styles. Either that or damp hair. They both stay put much better.
My main problem with that style of hair is that I have far too much plait. My hair is (just) knee-length so if I do two plaits they go down and back up to make the ’stick’ at the temple and then I’m left with … oh, at least 30 cm of plait or more. I have no idea where to put it!
Hi! Nice work!! About your question why the picture is black in the book: Have the same problem here, but thanks to a friend I found out that this probably is some printing problem, as in a digitalized version (from another printing date apparently) the original it is clearly visible :)
Is there any trick to form the small wire decoration? I mean, the bow is clear, but as I am – like you- without any knowledge of metalworking I would really be thankful if you could compart some inspiration about how to do it with me!
I think I have also seen the original picture somewhere before. That black squiggle in the book is pretty odd.
I did the small wire decoration so that I wound the thinner wire around the thicker wire, as tightly as it would go. I found that winding it around the lenghth of the approx 8 cm bit of wire I had cut out for the hair pin (the U-shaped bit), wrapping as tightly as I could get it, provided a nice amount of curled wire to wrap around the end of the pin. Then I gently wrapped the coil around the end of the U (after hardening the wire for the U), sort of feeling around to get the right tightness. I had left a few cm’s of wire straight at the end of the curled bit – that part I wrapped around the thicker wire to keep the curly bit in place. If I had a soldering tool I would probably have fixed it in place with that, but now I just pounded it a couple of times with a small hammer to make it stay put.
There! I hope that makes at least a little sense. ;)
Elina, the first edition of Dress Accessories has the complete image, the second edition from 2002 has the cut out. :) M Agnes ~
Ha! I knew I had seen it somewhere! I wonder if someone who has the older book could share that image with me.